Brimstone is a passive item.
Effects
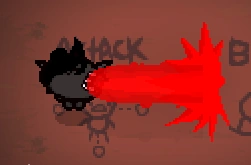
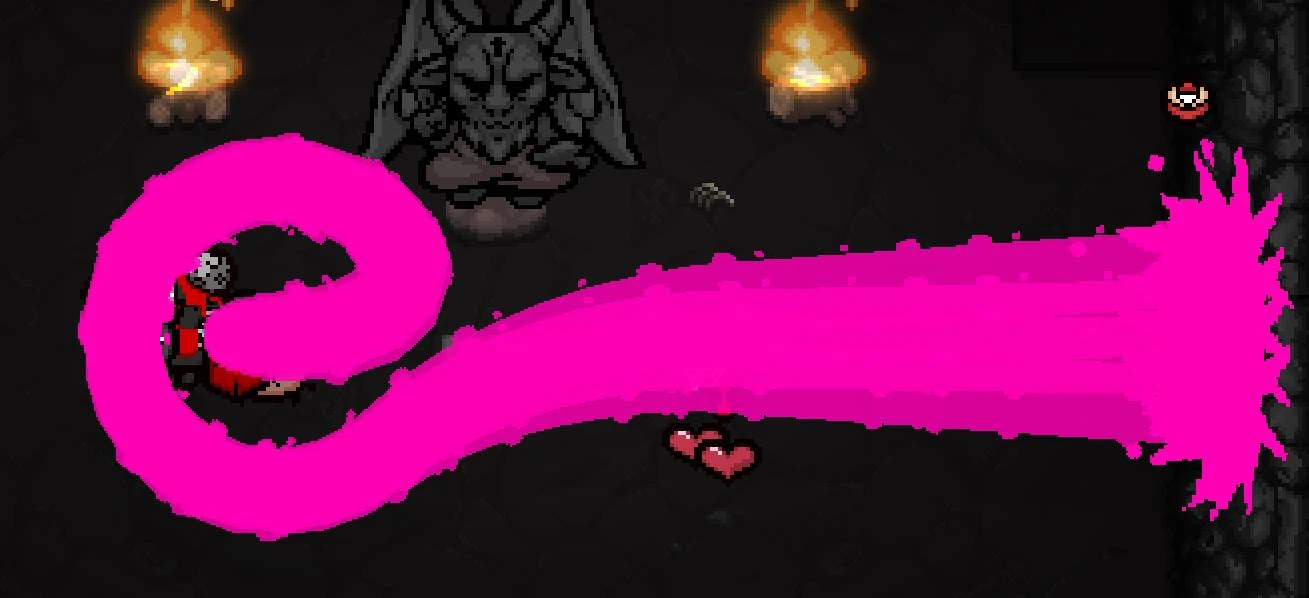
- Isaac's tears are replaced with a charged blood laser beam. The beam is piercing and spectral, dealing damage to all enemies and ignoring all obstacles in its path.
- The laser deals damage equal to Isaac's damage and deals damage each tick.
 Brimstone ticks 13 times over the course of about 1 second.
- Brimstone ticks 8 times in about 1 second.
- Tears down: Delay * 3.
- The laser deals damage equal to Isaac's damage and deals damage each tick.
- Template:Transf
Notes
- Brimstone is a special item.
- Azazel starts the game with a short-ranged, slower charging version of Brimstone. Picking up Brimstone with him will give him the long-ranged version. Without the long-range version, his mini-brimstone won't have enough length to use any homing items.
- His Brimstone's shorter range can be increased with range up items or pills.
- Multi-shot effects like 20/20 will increase the number of beams accordingly, with exceptions listed below.
- Although extremely unlikely, Isaac can shoot a total of 16 blood beams at a time via multi-shot items. If the number of blood beams would exceed this number, the beams' span will instead widen.
- The beam will apply status effects and does so frequently thanks to its high tick rate.
- If multiple Brimstones are picked up (via Diplopia, Crooked Penny or on a Victory Lap), then another beam is added, with no increase in charge time.
- Picking up a second Brimstone will grant Isaac a powered-up version with a much larger beam and no increase in charge time. +1 damage, 1.2x damage multiplier. Picking up additional copies of Brimstone will only add +1 damage.
- The bigger beam granted by double Brimstone synergizes with other items as expected.
- Tainted Azazel's beam width and damage will not be increased unless picked up twice, or with Chocolate Milk.
Synergies
- 8 Inch Nails: Beams gain knockback, pushing enemies away in the direction they travel but not out of their path. This increases its consistency.
- Almond Milk: Brimstone can be used without charging and will last indefinitely. The beam will also gain random worm trinket effects. Damage is significantly decreased. The beam can also be aimed in any direction with joystick controls.
- Apple! / Euthanasia / Tough Love: The beam can gain the damage multiplier from each of the items, although there is no visual difference. The bonus applies for the whole beam and not on a per-tick basis. Euthanasia loses its instant kill ability, however.
- Anti-Gravity: An orb of energy expands, then shrinks while firing the beam after a delay. The orb still hurts enemies if they touch it. Isaac can start charging a new shot immediately after releasing the fire key without canceling the first shot, effectively allowing for a faster firing rate. It makes it harder to hit enemies with Azazel as the beam does not increase in range.
- Anti-Gravity + Soy Milk: The Brimstone orbs remain as long as the fire button is held, similarly to Brimstone + Soy Milk but fixed in place. Isaac is unable to charge another shot while it is firing.
- Anti-Gravity + Incubus: Isaac will fire Brimstone orbs, while Incubus will fire regular Brimstone beams.
- Azazel + Birthright: The Brimstone beam will be widened as per the effect of Azazel's version of Birthright. Stacked with other beam widening synergies like Brimstone and Chocolate Milk, it can lead to a Brimstone blast that dwarfs even the Mega Blast in size, allowing for quick and easy room clears through the sheer size of the Brimstone beam.
- Brain Worm: The beam will curve 90 degrees in order to attack opponents, effectively acting as a stronger form of homing. Very strong against multi-segment bosses such as Mother.
- Brimstone: Gives the player a unique sprite as well as having double the size of a normal Brimstone beam.
- Compound Fracture/Cricket's Body: Non-brimstone tears have a chance to split off from the beam with applicable stats and tear effects.
- Chocolate Milk: Brimstone laser takes longer to fully charge, but can be released at any point during its charge. Width and damage of the laser increases at higher charges. Damage ranges from 25% to 250% of Isaac's tear damage per tick depending on how long the beam was charged for.
- Continuum: Brimstone laser travels through the wall and appears out the other side once.
- Crooked Penny/Diplopia: Picking up a second Brimstone grants a much larger beam with a 1.2x damage multiplier and +1 damage. Any further Brimstones picked up will only grant +1 damage.
- Epic Fetus: Overrides Brimstone's charging effect, but missile explosions shoot ten beams in all directions, massively increasing damage and area of effect.
- Explosivo: The beam has a chance to stick explosive tears to enemies.
- Eye of the Occult: Brimstone will automatically charge, then attempt to hit the wall Isaac is facing before curving towards the crosshair.
- Fire Mind: The beam will not cause explosions, but will still set enemies on fire.
- Guppy: Blue Flies are spawned at a rate of approximately one blue fly per tick ( every other tick) of damage for each enemy it hits, up to 13 flies. The spawned blue flies will also move to attack the targeted enemy immediately.
- Haemolacria: Increased charge time. Tears will burst into several beams that are fired in random directions.
- Holy Light: The beam has a chance of summoning a row of Holy Light beams.
- Homing tears: The beam will make sharp turns and even loops to hit enemies. Azazel's mini-brimstone does not home unless he has a high range stat.
- Hook Worm: Beam shifts left to right while firing straight and forms angles that constantly flatten and expand, effectively increasing its width.
- Ipecac: The beam gains a poison effect. Upon hitting an enemy, wall or obstacle, the beam causes an explosion. +2 flat damage. Fire rate is unaffected. The Ladder, when placed, will trigger the Ipecac-brimstone explosions.(possibly a bug)
- Jacob's Ladder: Upon hitting an enemy, wall or obstacle, the beam generates sparks that home in on enemies.
- Loki's Horns: Occasionally causes Isaac to fire the beam in all four cardinal directions, similarly to Head of Krampus's effect.
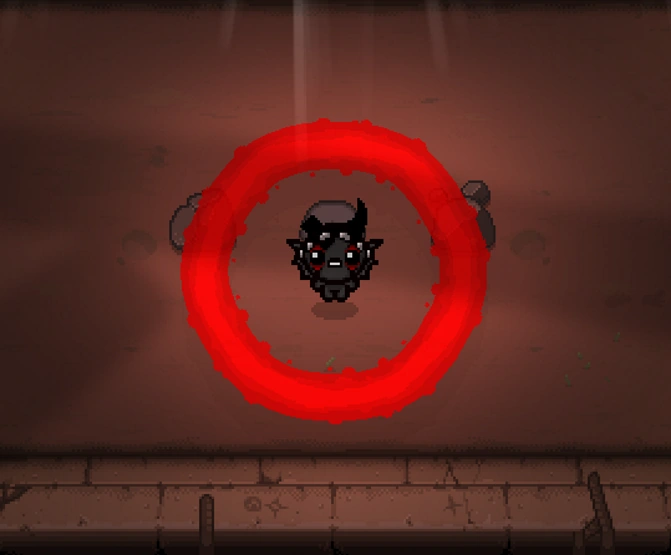
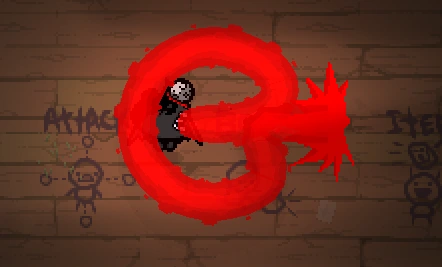
- The Ludovico Technique: The beam forms a large ring that is controllable and does not need to be charged. Enemies inside the ring without touching it are not hurt. The shot speed is ignored. The tears stat is ignored and the damage is dealt very rapidly at a rate equivalent to a 2 tear delay.
- A Lump of Coal: The beam gradually increases in size and damage the farther it travels, with the damage increasing on a multiplier that is roughly +20% per tile of distance. This allows for a huge damage increase from longer distances.
- Marked: Brimstone will automatically charge, then fire at the direction of the crosshair.
- Mom's Eye: Adds a chance to shoot a beam from the back of Isaac's head.
- Mom's Knife: Adds a small barrage of knives after the main knife is fired, with each knife doing 80% of Isaac's tear damage. The barrage of knives goes all the way across the screen and increases in quantity the longer the charge.
- Mom's Wig: Holding down a fire button to charge the attack very rapidly rolls the probability to spawn blue spiders; releasing to fire the beam, however, does not.
- Monstro's Lung: Fires 3-5 additional Brimstone beams in random directions around Isaac with no increase in charge time. Charging a new Brimstone beam removes the original from in front of Isaac, but not the additional ones added by Monstro's Lung. This effectively increases the fire rate.
- Charging a new Brimstone beam will now remove all shot beams, but fire rate remains that of Brimstone.
- Ocular Rift: Rifts may appear where the beam hits rocks, walls or enemies.
- Ouroboros Worm: The beam will make large loops on itself. The homing is present, but very wonky.
- The Parasite: Upon hitting an enemy, wall or obstacle, two perpendicular beams split from the main beam at 90 degrees from the closest point of intersection.
- Rubber Cement:
- Beams bounce off of walls, creating a second beam that deals half damage.
- If Azazel's mini Brimstone beam bounces off a wall, it effectively becomes a full-length Brimstone beam, but it will still only deal half damage.
- Azazel's Brimstone no longer becomes a full length beam after bouncing, instead bouncing as a regular mini-Brimstone.
- Sad Bombs:
- Upon exploding, bombs release ten beams in all directions.
- Brimstone does not benefit from Sad Bombs' flat damage bonus.
- Sinus Infection: The beam has a chance to stick booger tears to enemies.
- Soy Milk: Brimstone can be used without charging and will last indefinitely. Damage is significantly decreased.
- Strange Attractor: Enemies are attracted towards the beam, improving its consistency. Consumables will also be moved by the beam.
- Sulfur: Grants a larger beam with a 1.2x damage multiplier and +1 damage (same effect as picking up a second Brimstone).
- Sulfuric Acid/Terra The beam has a chance to destroy rocks every tick.
- Tammy's Head:
- Shoots ten beams in all directions. Given the item's single room charge, this makes for an extremely powerful synergy.
- Brimstone does not benefit from Tammy's Head's flat damage bonus anymore.
- Technology:
- The Technology laser coils around the Brimstone beam, granting a 1.5x damage multiplier (it stacks with other similar multipliers like Cricket's Head or Magic Mushroom).
- Technology's damage multiplier will be overridden if Isaac has the powered up version (from picking up Brimstone twice or using Sulfur with Brimstone).
- Tech X: Brimstone becomes a large laser ring that varies in size depending on how long it is charged before firing. The tear delay is that of Tech X.
- Tech X + A Lump of Coal: The Brimstone ring increases in size and damage the further it travels.
- Tech X + Mom's Knife: Mom's Knife and a Mom's Knife+Brimstone barrage are shot alongside the rings.
- Tech X +
- Tiny Planet: The beam will wrap around Isaac once and then shoot straight forward.
- Uranus: The beam will freeze any enemies killed by it, so long as they are not immune to the freeze effect.
- Wiggle Worm: Beam becomes wavy while firing straight, effectively increasing its width.
Interactions
- 20/20:
- Overridden by Brimstone.
- Adds a second Brimstone.
- Chocolate Milk: Reduces Isaac's tear delay by 20%. Doesn't increase damage.
- Compound Fracture/Cricket's Body/The Parasite: Splitting is overridden by Brimstone, but stat effects are still applied.
- Cricket's Body/The Parasite causes the end of the Brimstone beam to produce split shots, which behave like normal.
- Continuum: Overridden by Brimstone.
- Cursed Eye: Overridden by Brimstone.
- Dr. Fetus:
- Overrides Brimstone.
- Both fire normally; Isaac shoots bombs while charging Brimstone.
- Epic Fetus:
- Overrides Brimstone.
- While Epic Fetus synergizes with Brimstone (see above), Epic Fetus still overrides Azazel's mini-Brimstone.
- Evil Eye: Overridden by Brimstone.
- Explosivo: Overridden by Brimstone.
- Flat Stone: Overridden by Brimstone.
- The Forgotten: The charged attack will spawn a Brimstone ball that will float in front of The Forgotten for a few seconds before disappearing. The Forgotten will still melee attack while performing this action.
- Godhead: Homing and stat bonuses apply, but the beam does not have a damaging aura.
- Holy Light: Overridden by Brimstone.
- Ipecac:
- Isaac gains only the poison effect without either the increased damage nor the decreased fire rate.
- Isaac shoots Ipecac tears while charging Brimstone. Both Brimstone and Ipecac shots modify Isaac's damage and tear delay stat, meaning that Ipecac fires slower and Brimstone charges slower, but Brimstone deals drastically increased damage. Take care to pre-charge Brimstone so that the Ipecac shot is on cooldown as Isaac enters a room.
- The beam gains a poison effect. Upon hitting an enemy, wall or obstacle, the beam causes an explosion. +2 flat damage. Fire rate is unaffected.
- Isaac's Tears: Fires normal tears, but nearly instantly charges when charging Brimstone.
- Jacob's Ladder: Overridden by Brimstone.
- Kidney Stone: Overridden by Brimstone.
- Lachryphagy:
- Overridden by Brimstone.
- Brimstone has shorter range, a bit longer than Azazel's brimstone. It fires Lachryphagy tears at the end.
- Lead Pencil:
- Overridden by Brimstone.
- Lead Pencil has a chance of triggering every time the laser is fired.
- A Lump of Coal: No effect.
- Marked: Overridden by Brimstone.
- Monstro's Lung: Overridden by Brimstone.
- My Reflection:
- Overridden by Brimstone.
- Makes the beam curve when moving. It has the same effect on Azazel's mini-brimstone but doubles the range.
- Makes the beam shoot from the back. An oval beam is shot from the front instead.
- Mysterious Liquid:
- Overridden by Brimstone.
- When Brimstone hits enemies or walls, it leaves creep based on how long it hits.
- Number One + Azazel: Although Number One is otherwise purely beneficial with standard Brimstone, Azazel's range is severely affected.
- Pop!:
- Overridden by Brimstone.
- Brimstone has shorter range, a bit longer than Azazel's brimstone. It fires Pop! tears at the end.
- Proptosis:
- Damage is doubled with no drop-off at range.
- Damage is doubled twice, for a total of 4x next to Isaac, but quickly drops further along the beam, at about 0.8x per tile of distance.
- Pupula Duplex: Overridden by Brimstone.
- Rubber Cement: Overridden by Brimstone.
- Spirit Sword: Overrides Brimstone.
- Sulfuric Acid: Overridden by Brimstone. Stat effects are still applied.
- Tainted Samson: Greatly decreases attack speed for Samson's rage mode melee attack and replaces the thrown jawbone with a large laser sphere (similarly to The Forgotten).
- Technology: Overridden by Brimstone, but adds damage.
- Technology Zero: Overridden by Brimstone.
- Technology 2:
- Overridden by Brimstone, but retains the reduced damage.
- Both fire normally; the Technology laser fires while charging Brimstone.
- Tech.5:
- Overridden by Brimstone unless using Azazel, in which case it will fire normally while charging Brimstone.
- Tech.5 fires normally while charging Brimstone.
- Trisagion: Overridden by Brimstone.
In-game footage
Trivia
- The term brimstone (burn stone) comes from the King James Bible's mention of burning sulfur. It is used in the phrase "fire and brimstone" to describe the torments of hell. While solid sulfur is yellow, molten sulfur is blood red.
- Brimstone's item icon originally comes from the alchemical symbol for sulfur, referred to as the Leviathan Cross. It was later adopted by Anton LaVey in The Satanic Bible to represent hell and is now often associated with Satanism.
- The ram horns gained from picking up Brimstone were added as a cosmetic item to Team Fortress 2 to promote The Binding of Isaac: Rebirth. If the game was purchased before the 10th of December, players were awarded the item in genuine quality.
- Most items that change tear color will also give Brimstone an exotic appearance, but they do not combine and only one color effect is shown.
Gallery
- Brimstone's costume when powered-up by duplication or Sulfur.
Azazel's version.
The Ludovico Technique with Brimstone.
Tiny Planet with Brimstone as Azazel.
Brimstone with Tiny Planet, Common Cold and Tammy's Head.
The Ludovico Technique with Brimstone and Wiggle Worm.
Brimstone with Tiny Planet, Charm Tears and Quad Shot.


Seeds
PC ![]() YQRN NL4Q (First floor Devil Room, go to Curse Room, a Red Chest will teleport you there)
YQRN NL4Q (First floor Devil Room, go to Curse Room, a Red Chest will teleport you there)
PC ![]() DQY7 QK7M (The Basement XL: Second boss's Devil Room)
DQY7 QK7M (The Basement XL: Second boss's Devil Room)
PC ![]()
![]() QW44 N10D (Second floor Devil Room; Isaac may proceed normally, but all other characters must not enter the first floor Treasure Room.)[Check ingame]
QW44 N10D (Second floor Devil Room; Isaac may proceed normally, but all other characters must not enter the first floor Treasure Room.)[Check ingame]
PC ![]()
![]() B8TK KNEP (Second floor Devil Room.) [Check ingame]
B8TK KNEP (Second floor Devil Room.) [Check ingame]
Vita LHVK 9NTS (Second floor Devil Room)
PS4 SSH7 STDS (Second Floor Devil Room)
PS4 ![]()
![]() J21Z FJ0W (Second Floor Devil Room)
J21Z FJ0W (Second Floor Devil Room)
Switch ![]()
![]() DBDR SJGV (First floor Devil Room)
DBDR SJGV (First floor Devil Room)
3DS ![]() EXDL 3P62 (First floor Devil Room)
EXDL 3P62 (First floor Devil Room)
PC ![]() CEGH JQKF (Third Floor Devil Room)
CEGH JQKF (Third Floor Devil Room)
PC ![]() WVV7 FTPE (Second Floor Devil Room)
WVV7 FTPE (Second Floor Devil Room)